Page 1
LILAC Document Help
Warehouse - Create Layout
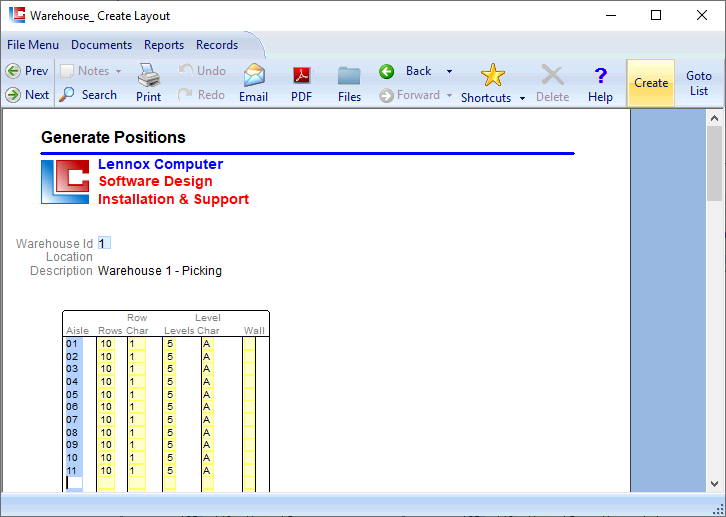
Define warehouse aisle, and racking (vertical row, and horizontal level). 'Create' from the ribbon will create the electronic version of the warehouse visible at Documents > Warehouse > Position List.
Sequence of Warehouse Documents
1. Documents > Warehouse > Warehouses
2. Documents > Warehouse > Create Layout
3. Documents > Warehouse > Position List
4. Documents > Warehouse > Location
2. Documents > Warehouse > Create Layout
3. Documents > Warehouse > Position List
4. Documents > Warehouse > Location
Establish via:
Documents > Warehouse > Warehouses
Documents > Warehouse > Warehouses
After selecting a Warehouse Id in the primary key field, this document allows the initialisation of Aisles, Rows, and Level. After data is entered into the above table, 'Create' from the ribbon will create the electronic warehouse in LILAC by expanding on the parameters selected in the document. The created electonic warehouse is visible at: Documents > Warehouse > Position List.
Definitions/Suggestions
Aisle
Row
Row Char
Levels
Level Char
Wall
Row
Row Char
Levels
Level Char
Wall
- Aisle (a side, or, may be a passage between two sides)
- Number of vertical rows/columns. Suggestion: Establish either side of an aisle. Odd numbers 1,3,5, etc on one side of an aisle (left), even numbers 2,4,6, etc on the other side (right).
- Beginning row character. Enter 1 here. 'Create' from the ribbon will apply 1 -> 10 automatically, as in this example 10 Rows are defined.
- Number of horizontal levels per aisle.
- Beginning level character. Enter A here. 'Create' from the ribbon will apply A -> E automatically for 5 levels.
- May be used for rows and levels against a wall.
Ribbon Buttons
Create: Create warehouse positions for current setup. Then view the generated warehouse at Documents > Warehouse > Position List
Goto: Shorcut to: Documents > Warehouse > Position List
Goto: Shorcut to: Documents > Warehouse > Position List
